Performance of RAID Arrays on Windows Azure: an Alternative to Horizontal Scaling

HDD issues
While working with several different NoSQL databases heavily loaded with write requests, we faced a situation when the hard drive became a bottleneck. Scaling the cluster horizontally could easily solve this kind of problem, but it would also increase monthly payments. This is why we decided to take a look at other options.
The first thing that comes to mind when a database starts experiencing the hard disk drive (HDD) performance issues is to combine several virtual drives into a RAID array. To check how it will work with the Windows Azure virtual infrastructure, we compared the performance of a single virtual drive and different RAID arrays (types: 0, 1, 4, 5, and 6), using the Bonnie++ tool for hard drive subsystem verification.
In this blog post, we share the test results and step-by-step instructions on how to configure a RAID array on your own.
RAID performance under different workloads
In the first test, we measured the performance of different RAID arrays for simple read/write operations:
1 | sudo bonnie++ -d /raid1/ -m 'raid1' -u root -n 100:8192:16384:20 -x10 -s 16g -f > raid1.csv |
Bonnie++ was run 10 times (-x10). Each test worked with 100 files of 8-16 KB in size and 20 subdirectories. In total, there were 16 GB of “files” in each iteration. Since a large Windows Azure instance has 7 GB of RAM, we had a chance to avoid caching.
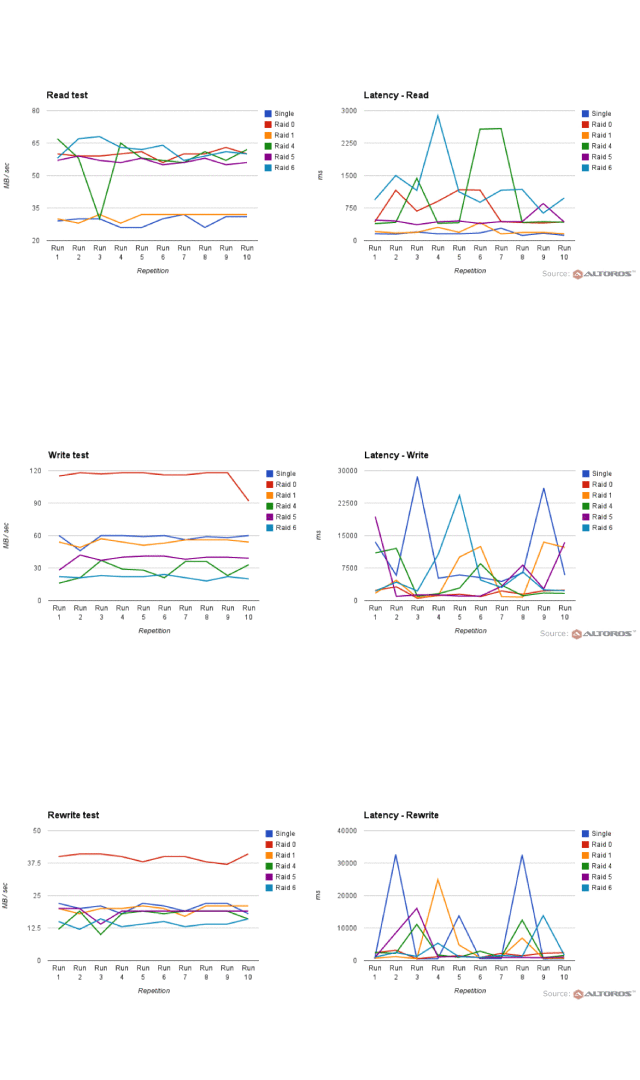
The first test results can be seen below. The x-axis stands for megabytes per second, the y-axis indicates repetitions (we ran each test 10 times).
 The write test results
 The read test results
 The rewrite test results
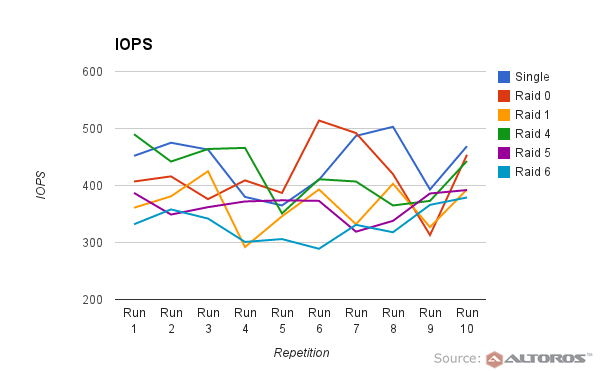
 Input/output operations per second
According to these results, RAID 0 demonstrated the best performance in the write test and almost the same results in the read test. The IOPS values ranged from 350 to 450 for all RAID types.
Performance of 2, 4, and 8 drives in a RAID array
In this section, we explore how the number of virtual drives affected RAID performance. For this test, we started two more large instances. One of them was used to create a level 0 RAID array of four drives and the other one for a level 0 RAID array of eight virtual drives:
- four drives:
1sudo mdadm --create /dev/md0 --level=0 --raid-devices=4 /dev/sdc /dev/sdd /dev/sde /dev/sdf - eight drives:
1sudo mdadm --create /dev/md0 --level=0 --raid-devices=8 /dev/sdc /dev/sdd /dev/sde /dev/sdf /dev/sdg /dev/sdh /dev/sdi /dev/sdj
We ran the same test on both VMs.
1 | sudo bonnie++ -d /raid0/ -m 'raid0' -u root -n 100:16384:16384:20 -x10 -s 16g -f > raid0.csv |
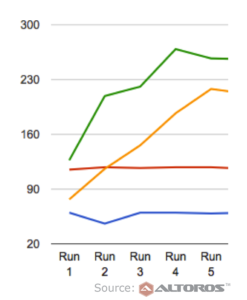
The diagram below represents the results of RAID read and write tests.
 The RAID read and write test results
Stability check
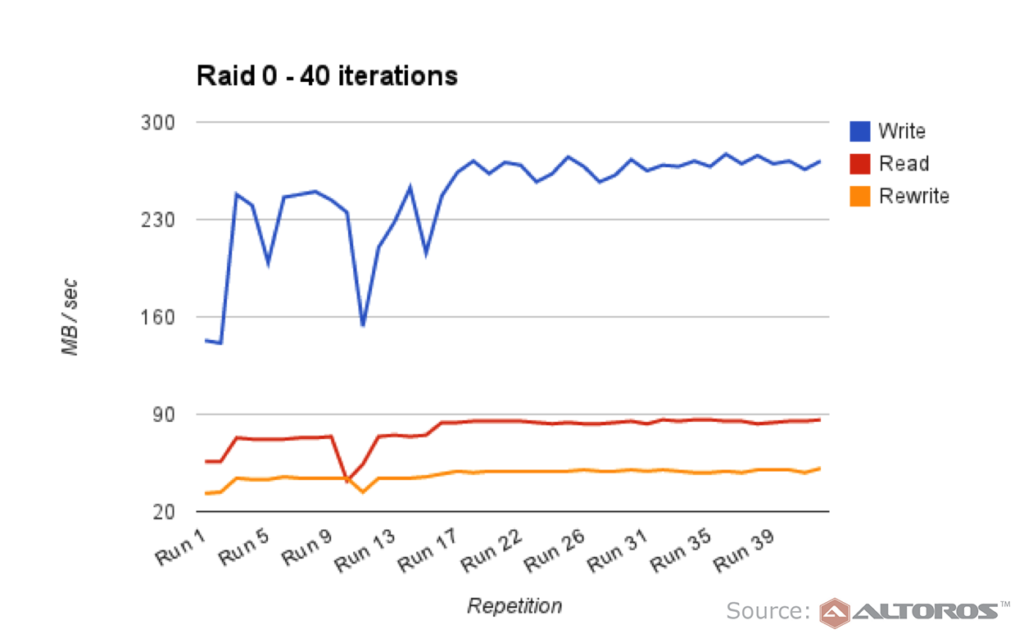
The last test was to check how stable Azure storage is. Here, we consequently tested RAID performance under a workload for 8+ hours.
 The RAID iterations test results
Summary
Given the results of all three tests, we can make the following conclusions:
- Windows Azure virtual drives work faster when combined in a RAID array. A level 0 array is the fastest storage.
- The number of virtual drives has the biggest effect on write operations. A RAID 0 array with eight nodes works 4.5 times faster than a single virtual drive.
- When performing read operations, eight nodes work two times faster than a single drive.
- Virtual disks work faster when in use.
 The RAID read and write test results
Red and blue lines represent the servers that had already been used in Test 1. Green and yellow lines stand for the new servers that we started for Test 2. Every time a new server is created and starts using HDD heavily, it takes ~30 minutes for it to accelerate to the maximum speed.
How to configure a RAID array
The following steps will help you to set up a RAID array for your own project:
- Attach empty drives to a VM using a CLI or a Web interface. The number of disks that can be attached depends on the VM’s size.
- Use the following commands to find the names of the disks:
a) CentOS:
1vi /proc/partitionsb) Ubuntu:
1sudo lshw -class disk
- Combine them into a RAID array (all the disks from step one must be listed in this command):
1sudo mdadm --create /dev/md0 --level=0 --raid-devices=2 /dev/sdd /dev/sde - Mount the newly created RAID disk to the file system using the following commands:
1sudo mkfs.ext3 /dev/md01sudo mount /dev/md0 /raid0
That’s it. Now you can start using your new disk. Still it is worth reading the “Saving your RAID configuration” section here.
More RAID performance results
We’re also planning to run other tests for RAID arrays on Windows Azure. In particular:
- Re-test RAID 0 and 1 in the multi-thread mode (we expect the results to be different)
- Try to improve read performance by changing the “read ahead” parameter in RAID configuration
- Test how a real database will perform on RAID disks
Related slides
Further reading
- Hadoop on Windows Azure: Hive vs. JavaScript for Processing Big Data
- Hosting a Big Data Meetup: Hadoop on Windows Azure from Microsoft First-Hand
- Cloud Platforms: Windows Azure—Ideal Cloud Architecture for .NET Developers


