Deploying a Blockchain App on Cloud Foundry and Kubernetes
What’s needed for a DApp on CF+K8s
Using blockchain, various industries have been able to improve efficiency through automation of mundane, manual processes in a secure and transparent manner. Commonly, for a blockchain (Ethereum) implementation in production, there is a need for:
- a server-client app to build a network
- a decentralized app (DApp) to process the data stored
According to Yauheni Kisialiou of Altoros, this process can be split into three major steps:
- push a DApp to Cloud Foundry
- build a service broker between the platform and the DApp
- containerize the DApp
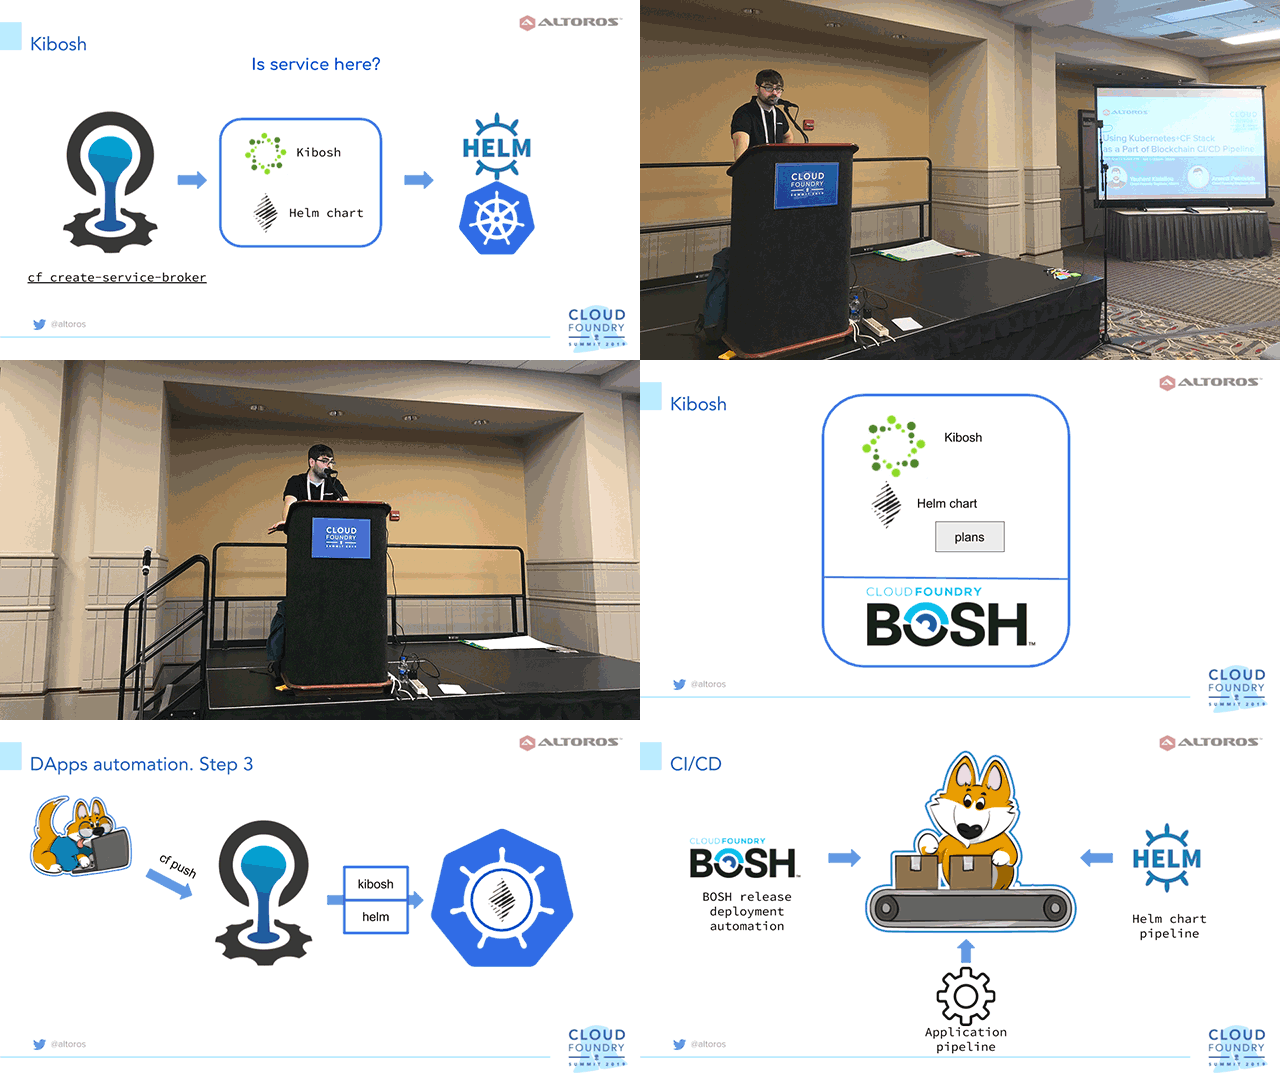
 Yauheni Kisialiou at Cloud Foundry Summit North America 2019
In this model, a service broker is needed to determine:
- the way the platform knows about the service
- how many resources should be assigned
- what should be done with a service to make it ready to use
- how a developer can access the service
At the recent CF summit in Philadelphia, Yauheni shared his experience of developing DApps on Cloud Foundry and Kubernetes, taking a closer look at each of the steps listed above.
Three steps in detail
So, what are the major tasks behind deploying a blockchain app on Cloud Foundry coupled with Kubernetes?
1. Push a DApp to Cloud Foundry
At the beginning, having Cloud Foundry already set up, Yauheni suggests running cf push for a voting app. (Currently, some minor issues related to the inconsistency of the npm module version may occur in the app repository and in the Cloud Foundry buildpack. To fix the issue, one can recreate package.json to successfully push the app.)
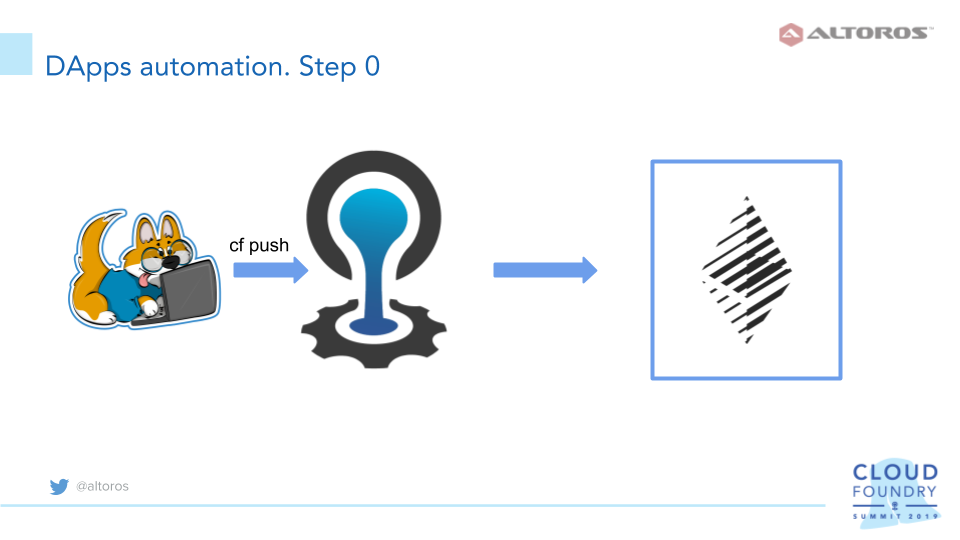
Yauheni recommends utilizing Parity—an Ethereum client providing core infrastructure for services—on a separate VM, specifying its address in the app configurations. To achieve more flexibility and overcome the limits of persistence, the Parity client can be moved to Kubernetes, which is quite simple, since Parity has an official Docker image. Then, Parity has to be exposed as a Kubernetes service, and the address should be set in the app configurations.
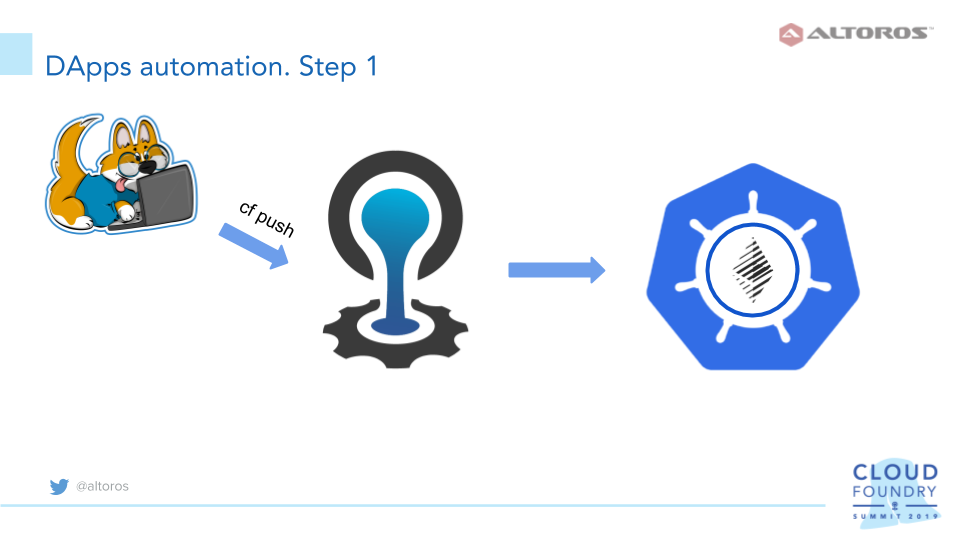
With Parity serving as a middleware between an app and a database, the next step is to bring an app deployed to Cloud Foundry and Parity implemented as a service in Kubernetes together.
2. Build a service broker
To enable a solution to be deployed and destroyed as an on-demand service via the CF CLI, as well as to automatically provide connection parameters, a service broker has to be created.
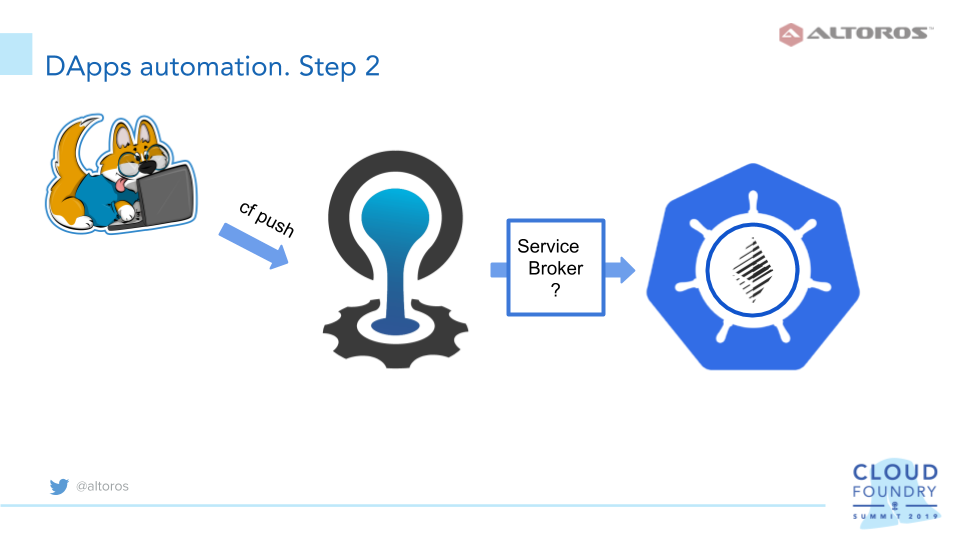
Typically, a service broker is implemented as a web app, and the platform is a client for this web app. It answers API calls, and returns corresponding JSON objects to the platform. The most common types of service broker deployments are:
- as an app on Cloud Foundry
- as a BOSH release on a separate VM
Though, as long as a service broker is a web app in the first place, you may choose any deployment method you find convenient, be it a Kubernetes container, an Ansible playbook, a bare-metal server, etc.
While a typical broker takes some resources from the pool (for example, creates a database instance in an already provided cluster), an on-demand service broker creates the cluster by request, and removes it when it’s no longer needed. Generally, an on-demand service broker operates BOSH and deploys service instances as BOSH releases. With services deployed to Kubernetes, a developer enjoys more flexibility and better hardware utilization, that is why Yauheni suggests this container orchestrator to run on-demand Parity clients.
3. Adopt Kibosh
The next step is to adopt Kibosh to deploy Parity clients to Kubernetes on demand. Kibosh is an open service broker that ebables a developer to automatically create resources in Kubernetes upon request. With Kibosh, one can use the familiar CF CLI, and all the necessary configuration data is transferred directly to the app via environment variables. A developer then simply parses the variables in his/her programming language of choice.
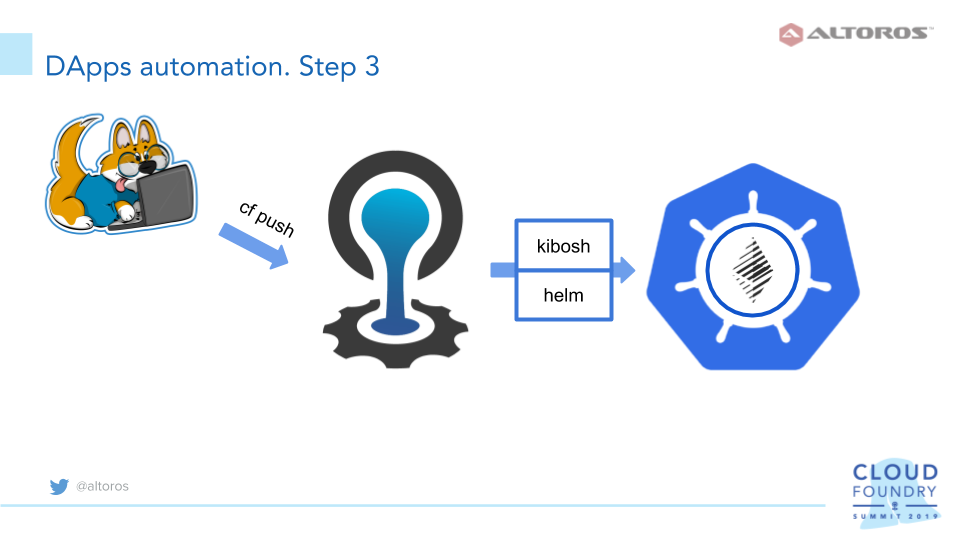
Kibosh uses Helm to deploy resources to Kubernetes, so, there is a need to create a Helm chart for Parity, using the existing deployment.
To understand how the solution works, let’s take a look at how Helm, Kibosh, and a Parity chart in the existing deployment address the tasks usually assigned to a service broker.
Creating a service
Like an ordinary service broker, Kibosh answers API calls and can be registered through the CF API call. As a result, Kibosh service offerings will appear in the Cloud Foundry marketplace, ready to be used by developers and operators via the cf create-service and cf bind-service commands.
When the create-service request is received, Kibosh will deploy a Helm chart to Kubernetes. Then, a Kubernetes cluster access parameters should be configured. Kibosh will use Helm to manage Kubernetes. To make Helm usable, the necessary resources, such as a namespace and a service account, will be created automatically.
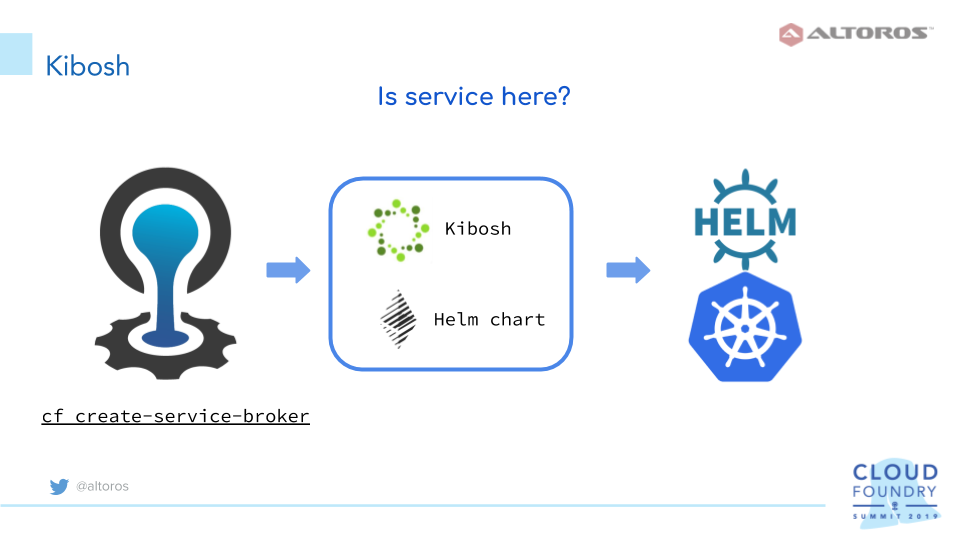
To register a service broker, one can use the cf create-service-broker command, but the process is actually automated via a special errand provided by the Kibosh team, so you just need to deploy it via a manifest.
1 2 3 4 5 6 7 8 9 10 11 12 13 14 15 16 17 18 19 20 21 | - azs: - z1 instances: 1 jobs: - name: cf-cli-6-linux release: cf-cli - name: register-broker release: kibosh lifecycle: errand name: register-broker networks: - name: default properties: broker_name: kibosh-parity cf: admin_password: ((cf-admin-password)) admin_username: admin api_url: ((cf-api-url)) disable_ssl_cert_verification: true stemcell: bosh-google-kvm-ubuntu-xenial-go_agent vm_type: default |
Then, run the following command.
1 | bosh -d kibosh run-errand register-broker |
Assigning resources
The Parity chart (or any other Kibosh-driven Helm chart) should have definitions of service plans, as a typical service broker usually does. In case of an ordinary service broker, a definition is a JSON response with a plan definition generated by a service broker. Kibosh will generate this output itself, however, the plan descriptions should be provided.
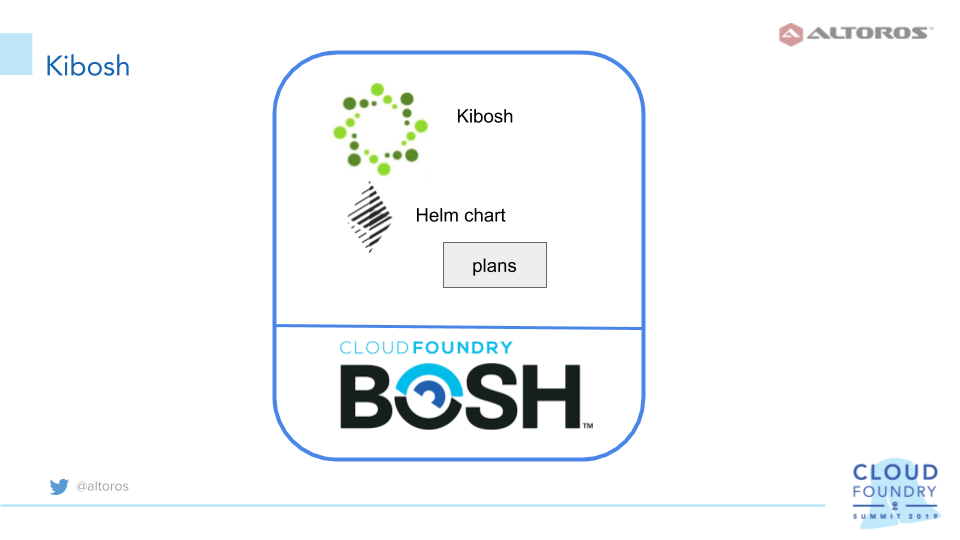
The chart used in this example has values.yaml with Parity and deployment parameters defined. The plans.yaml file can be used to define plans, as well as a plans directory to place files with a possibility to redefine the values.yaml variables. This results in having several plans with a special set of variable values each. Below is the structure of the chart files.
1 2 3 4 5 6 7 8 9 10 | $ ls -la parity-chart total 28 drwxrwxr-x 4 eugene eugene 4096 Apr 11 18:45 . drwxrwxr-x 3 eugene eugene 4096 Mar 26 10:30 .. -rw-rw-r-- 1 eugene eugene 122 Mar 26 10:30 Chart.yaml -rwxrwxr-x 1 eugene eugene 0 Mar 26 10:30 .helmignore drwxrwxr-x 2 eugene eugene 4096 Mar 26 17:36 plans -rw-rw-r-- 1 eugene eugene 71 Mar 26 10:30 plans.yaml drwxrwxr-x 2 eugene eugene 4096 Mar 26 10:30 templates -rw-rw-r-- 1 eugene eugene 596 Mar 26 10:30 values.yaml |
Here is an example of a plan definition and variable reassignment.
1 2 3 4 | $ cat plans.yaml - name: "default" description: "default plan" file: "default.yaml" |
1 2 | $ cat plans/default.yaml appname: paritynode |
In this case, only the default plan is used, though, there are such variables as the number of Parity nodes and a client version, which can be redefined for different plans. For more examples of defining plans, check out the kibosh-sample GitHub repository.
Exposing a ready-to-use service
With an ordinary service broker, a logic should be defined to create databases or user accounts, generate credentials or make some external API calls. With Kibosh and a Parity client, everything is done via a Helm chart.
Due to the decentralized nature of blockchain, nothing specific should be done with Parity, except for configuring it on a start-up with a special configurational file. So, all we need is init script in configmap in a Helm chart template and the above-mentioned values.yaml file.
Our colleagues have created a template that triggers the number of Parity nodes required by a developer and connected to a specified network. The template is fairly simple, yet flexible, and can be easily customized to fully comply with the functionality of Parity. Below is a sample template, which illustrates the usage of parametrized Parity configurations in the Kubernetes configmap.
1 2 3 4 5 6 7 8 9 10 11 12 13 14 | cat templates/configmap.yaml {{- range .Values.nodes }} --- kind: ConfigMap apiVersion: v1 metadata: name: bootstrap-{{ .branch }} data: script: | #!/bin/ash git -c http.sslVerify=false clone https://github.com/poanetwork/poa-chain-spec.git /tmp/poa-chain-spec cd /tmp/poa-chain-spec git checkout {{ .branch }} … |
Accessing the service
Kibosh returns the definitions of Kubernetes objects, such as services and secrets, to the VCAP_SERVICES environmental variable. By parsing this variable, a developer can easily find how to get to the service container and what credentials use to log in. Partially, the JSON file of VCAP_SERVICES is exemplified here.
1 2 3 4 5 6 7 8 9 10 11 12 13 14 15 16 17 18 19 20 21 22 23 24 25 26 27 28 29 30 31 32 33 34 35 36 37 38 39 40 41 42 43 44 45 46 47 48 49 50 51 52 53 54 55 56 57 58 59 60 | echo $VCAP_SERVICES .... "poanode":[ { "Label":"poanode", "provider":null, "plan":"default", "name":"poatest", "tags":[ ], "instance_name":"poatest", "binding_name":null, "credentials":{ "secrets":[ { "data":{ "branch":"core", "chainid":"\"99\"", "name":"core", "testnet":"\"true\"" }, "name":"core-branch" }, … "services":[ { "name":"poanode-tcp-core", "spec":{ "ports":[ { "name":"rpc", "protocol":"TCP", "port":8545, "targetPort":8545, "nodePort":30350 } ], "selector":{ "app":"poanode-core" }, "clusterIP":"10.11.246.134", "type":"LoadBalancer", "sessionAffinity":"None", "externalTrafficPolicy":"Cluster" }, "status":{ "loadBalancer":{ "ingress":[ { "ip":"10.10.10.10" } ] } } }, … |
Actually, Yauheni says, he didn’t need the credentials, as authentication is the responsibility of the DApp itself and a wallet communication. Still, one needs some specific key-value configurational pairs, such as a network ID or a boolean showing that the network is a testnet. Yauheni had an idea to embed this information to service labels, but, unfortunately, this is not working for Kibosh yet, and he had to use a more traditional approach: secrets. Kibosh is mature enough to decode base64-encoded Kubernetes secrets, that’s why one can see decoded values in the credentials/secrets section in VCAP_SERVICES.
To deploy Kibosh, a developer can follow the standard procedure described in the solution’s GitHub repo. Kibosh itself and a Parity chart can be collocated as a BOSH release deployed to a single virtual machine. Yauheni revealed that he slightly modified the Kibosh’s repository manifest with errands added and an image uploader removed, as he was using the Parity image and didn’t upload any images.
Building a CI/CD pipeline
So, at this poit, the developed service described here comprises three tightly connected components. A CI/CD pipeline—aimed to automate the system—will accordingly consist of three logical parts, as well.
The first one is the delivered Parity chart, which uses Helm under the hood. When any change is needed for this component, smoke tests are executed.
The Helm chart alongside with Kibosh and its components are part of a BOSH release. Under the CI/CD workflow, any changes to the repositories—where the development of Kibosh and Helm charts is maintained—are monitored. Once the changes are in force, a new version of a BOSH release is pushed and stored in a specified AWS S3 instance, as well as deployed to the dev environment.
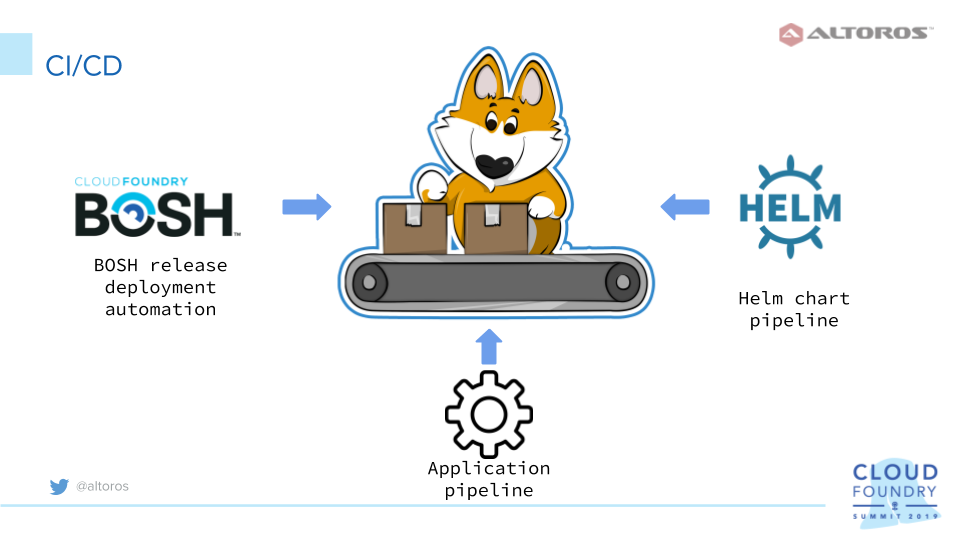
Finally, the delivered CI/CD workflow is responsible for assembling and testing the developed DApps. The release version of a DApp is deployed to Cloud Foundry with a corresponding service automatically created for it. Using Kibosh, this service is then deployed to Kubernetes.
Cloud Foundry is a mature platform for developing DApps in a fast and agile manner. When building a blockchain-based application, however, a developer also needs to utilize stateful clients, which configurations and versions may differ dramatically. Kubernetes significantly facilitates deployment of such clients. To automate this process via the CF CLI means, as well as ensure smooth integration between Cloud Foundry and Kubernetes, Yauheni recommends employing Kibosh.
 Yauheni Kisialiou explains the developed CI/CD workflow
This tool proved to be efficient in a dev environment, when there is a need to bind stateless apps on Cloud Foundry with stateful services in Kubernetes. Furthermore, Kibosh allows for deploying Helm charts to Kubernetes, tuning a variety of service plans for these charts, as well as setting up the necessary parameters inside an app container. Finally, Kibosh is convenient to use for Cloud Foundry developers for it is shipped as a BOSH release.
Want details? Watch the video!
Table of contents
|
These are the slides presented by Yauheni.
Further reading
- Considerations for Running Stateful Apps on Kubernetes
- Deploying Services to Cloud Foundry Using Kubernetes: Less BOSH, More Freedom
- Blockchain as a Service: Running Cloud Foundry Apps on Ethereum
About the authors

Yauheni Kisialiou is Cloud Foundry DevOps Engineer at Altoros. He specializes in enterprise cloud platform support and automation, using almost 10 years of experience in cloud administration and building cloud systems. Yauheni is highly adept at using BOSH for deploying Cloud Foundry and other services. Now, he is part of the team working on container orchestration enablement for a leading insurance company.


