Creating a Custom Cloud Foundry Buildpack from Scratch: What’s Under the Hood
Pre-history
Buildpack is a core link in the chain of the Cloud Foundry deployment process. It automates detection of an application framework, application compilation and running. Being a happy user of Cloud Foundry for a long time, I haven’t had any troubles while using the official buildpacks for Ruby, Java, and Python projects.
Customization of the staging process was also easy by forking the existing buildpacks and extending them. A common development practice for custom buildpacks is forking existing buildpacks and synchronizing subsequent patches from upstream. You can even use a branch of your fork or private github repos with the ‘cf push’ command. So, there were no actual limitations for these cases.
I guess, you all know Jenkins CI, a popular Continuous Integration service. A lot of developers use it in their daily work. So, Jenkins community recently delivered a plugin that provides Cloud Foundry support.
Still, when I tried to deploy Jenkins as a Cloud Foundry application, I faced issues that couldn’t be resolved in a regular manner. The standard Java buildpack supports a lot of frameworks—thus, it is too complicated to work with. Jenkins features runtime dependencies that make it even harder to run it using the Java buildpack. That’s where I’ve come up with an idea to write a brand new buildpack from scratch. As a result, I delivered a working buildpack and got the hang of how it should be done.
Gladly, the official Cloud Foundry documentation was of a great assistance to me:
Now, let’s move on to the main components essential for creating a buildpack.
DEA in a nutshell
DEA (Droplet Execution Agent) is a Web service that allows for uploading and running applications in the Cloud Foundry PaaS. DEA is written in Ruby, which makes it possible to run it on different systems. Moreover, DEA is enhanced with the Event Machine gem to process requests asynchronously. The Cloud Controller uses the DEA API to manage application containers.
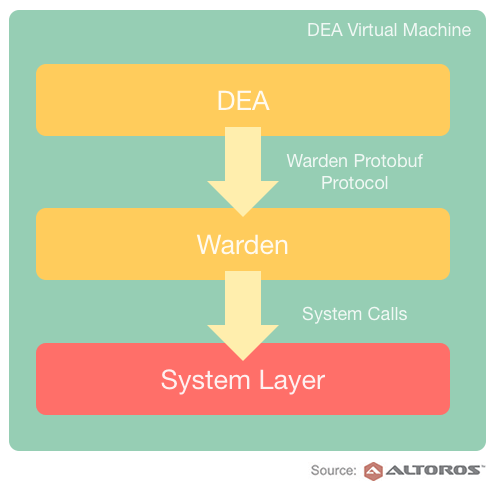
DEA runs over Warden, which is a Web server that uses protobuf to define its protocol. Then, Warden translates requests into the language of an operating system. For instance, in Linux-based systems it executes Bash scripts.
It is made to hide differences and complexities of containerization on different platforms. For example, it is possible to use almost the same code of the DEA server in Iron Foundry to add Windows Stack to Cloud Foundry. At the same time, Iron Foundry uses another implementation of Warden that handles process isolation on the Windows platform.
Detect, compile, and release scripts
The functional part of a buildpack consists of three scripts: detect, compile, and release ones. They are executables that can be implemented in any way you are comfortable with. As a rule, buildpacks use the Ruby language for these scripts (Java and Ruby buildpacks). Still, if the functionality is simple, e.g. there is no need to support multiple frameworks, you can use Bash (as it is done in the Node.js buildpack).
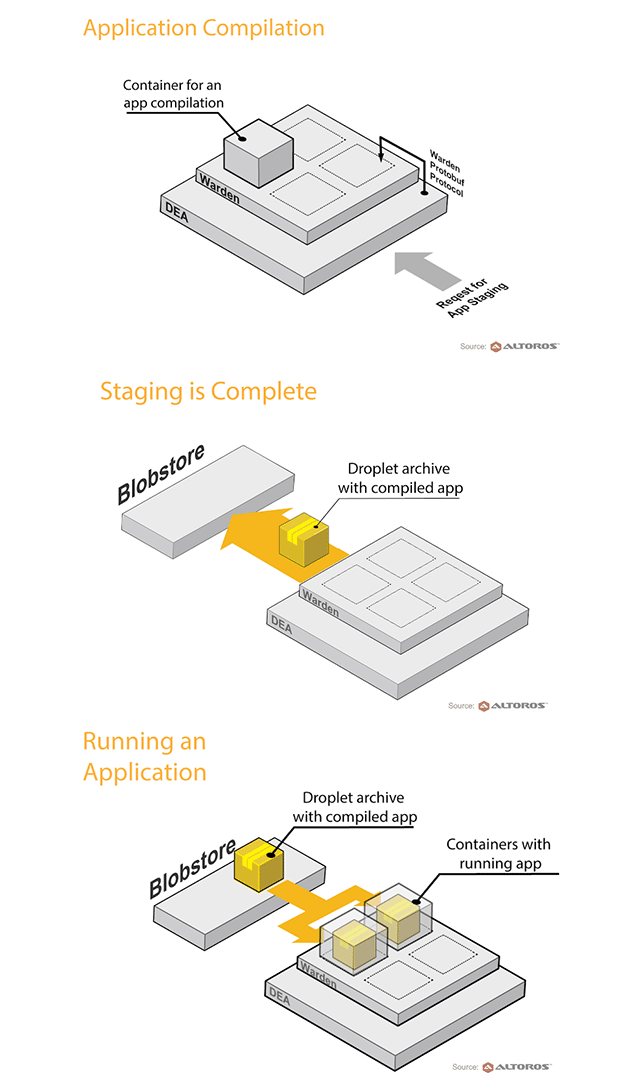
When DEA gets a request from the Cloud Controller to stage an app, it places the code to a container and starts to look for a suitable buildpack. It calls the ‘detect’ script in every buildpack and chooses the first to return 0. Thus, the order of a buildpack is important. Usually, a buildpack checks the presence of specific files at this stage. Therefore, several technology stacks within one project can result in errors.
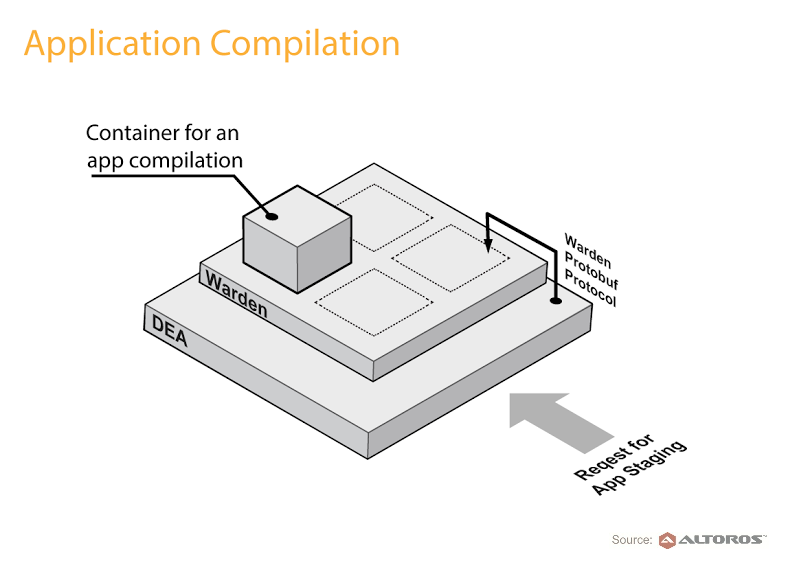
After that, the ‘compile’ script of the detected buildpack is called. This script gets two parameters: cache folders and paths to build. A build folder is a folder that contains all the necessary assets to get an application running. After the compile process is finished, this folder is archived to the so-called droplet tarball, which travels to a blobstore. A cache folder is used to store all the intermediate data that is necessary to compile an app, such as a source code or object files. Keep in mind that you need to store all the additional libraries and binaries in a build folder to have access to them, when you run an application.
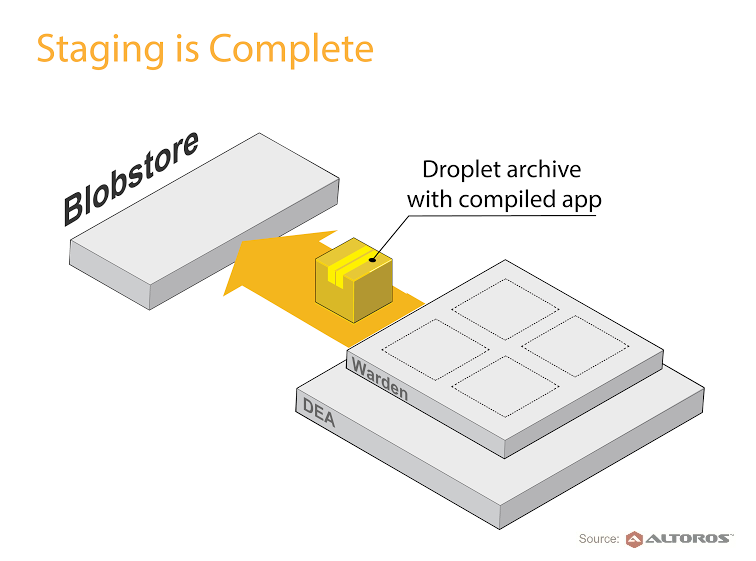
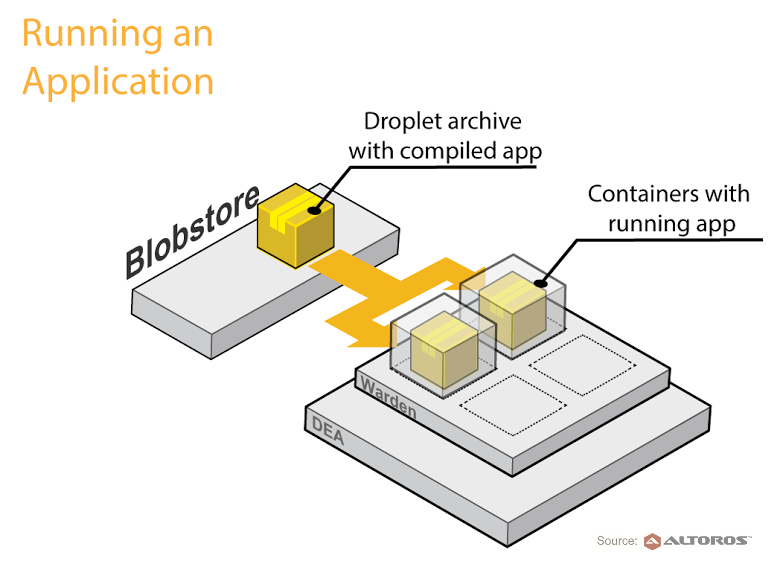
After a droplet is uploaded to a blobstore, DEA asks Warden to run new containers for each application instance. In Linux-based systems, Warden uses rootfs (specified in config) to have the initial file structure for these containers. Each container gets an application droplet from the blobstore and unpacks into the “app” folder within a home directory of a vcap user.
Then, the ‘release’ script is executed. DEA expects it to print to a standard output with YAML parameters to run the application. You can store the YAML file in the build directory and then print it as in the Ruby buildpack, or use the Bash script, as it is done in the Node.js buildpack.
To check if an application works, either make sure an application port is open or check it via “state file.” In case your application runs as a background job, you can specify the “–no-route” option to prevent Cloud Foundry from executing the ‘cf push’ command.
Debugging
If an application crashes during staging or a start, all application containers are removed. It is done in several places: immediately after an app crash and within a reaper process that removes everything that does not correspond to the running containers from a depot folder to save disk space on the DEA machine.
You can prove that scripts from your buildpack run properly by running them on your local machine [link]. Still, when something goes wrong, I settle the issue by getting an access to the crashed container. There is no explicit parameter that prevents DEA from killing application containers, but there is a parameter that defines time before DEA deletes containers [link to vcap-group]. Thus, you need to get the ssh access to a DEA instance and to add the container_grace_time parameter with some large number to a server hash in the Warden configuration file—stored in /var/vcap/jobs/dea_next/config/warden.yml (find this option in a Warden repo [link to config]). After that, you need to restart the Warden process with Monit using the following command: /var/vcap/bosh/bin/monit -I restart warden. Be careful, it will remove all working containers that you currently have in DEA. That done, you will be able to access your crashed container by going to a container folder in a depot directory—usually, it is /var/vcap/data/warden/depot/<container-handle>—and running sudo ./bin/wsh. That’s it, you are in! Remember, all the apps run under the ‘vcap’ user.
Sometimes, DEA removes those applications that can not run without the Warden grace time option. In this case, you can even patch DEA or Warden to leave your containers for good. To patch Warden, you need to comment the content of the ‘do_destroy’ method in the ‘linux.rb’ file in the following directory: /var/vcap/jobs/dea_next/packages/warden/warden/lib/warden/container/. If you decide on patching DEA, you can use this gist for cf-release v192. As long as the operation is quite risky, never try to run such stuff on production machines.
I would also recommend you to read about application troubleshooting in the Cloud Foundry documentation.
Tips for developers
There are some other things that can be helpful for developers. Check out the GitHub cf-builpacks organization for this kind of products.
There you can find some useful helpers to deal with routine tasks in your buildpack. It’s a common thing to use Git submodules for adding repositories with helpers. Take a look at the following repos:
Another development best practice is to test your code. If you write a buildpack in Ruby, you can choose from a great number of testing frameworks. For example, you can use the Machete testing framework, since it is written specifically for buildpacks:
It’s not that hard to deploy applications with custom dependencies on Cloud Foundry, you just need to be familiar with under-the-hood mechanisms of the Cloud Foundry PaaS.


