How to Add BOSH Support to a Custom Cloud (Part 2): External BOSH CPIs

Until recently, all custom BOSH CPIs were forks of the BOSH project. They were hard to maintain and had to be implemented in Ruby. In August 2014, the BOSH team introduced the new external CPI mechanism that has removed these constraints. The second part of our blog series on adding BOSH support to custom clouds will be dedicated to external BOSH CPIs, how they are used, and what it takes to build one.
What are BOSH CPIs?
The BOSH CPI stands between BOSH and the IaaS provider. It encapsulates the cloud API specification and complexities, providing BOSH with a simple interface, which is described in the BOSH::Cloud class. If you look at it, you will see that the list of methods is pretty simple: create_vm, delete_vm, attach_disk, create_disk, and so on. The BOSH CPI also provides BOSH Agent with the information it needs.
BOSH CPIs are used by BOSH Director and during MicroBOSH deployment. They are also used by a new tool called bosh-init, which will be described below. To understand CPIs well, you will need to learn how BOSH Director and the bosh-init tool perform deployment of BOSH jobs through the CPI. You also want to understand how the CPI communicates with BOSH Agent, which is built into every BOSH stemcell.
As we have mentioned, there are currently two ways to implement a BOSH CPI: the old fashioned method where the CPI is built into the BOSH project as a gem and the new way, the so-called “external CPI.” So, why did the BOSH team go through all the trouble of creating a new CPI mechanism?
Why external BOSH CPIs were introduced
In the beginning, there were only built-in BOSH CPIs. The BOSH team officially supported five infrastructure providers that were integrated with the BOSH project: AWS, OpenStack, vSphere, vCloud, and Warden. With this approach, the only way to add BOSH support to a new cloud was to fork the BOSH project and make changes all over its code. This meant that you had to update your CPI every time BOSH was updated, and you could only use Ruby as the implementation language.
You can find a description of these issues in our blog post that explains how to create a BOSH CPI for GCE using this approach. You may also want to look at this interesting discussion of the Azure CPI in the bosh-dev group.
Meanwhile, the BOSH team was implementing the new external CPI mechanism that would eliminate all the constraints. Today, we can finally see it starting to roll. In addition, a new modern way to deploy MicroBOSH, called bosh-init, was introduced. Let’s take a closer look at how they work.
What’s new in external CPIs
The main difference between regular BOSH CPIs, which I have previously described, and the external CPI mechanism is that calls to methods of the Bosh::Cloud Ruby class have been substituted with execution of a binary file. To understand how this works, you need to look inside the implementation of the ExternalCpi class that is, in fact, a wrapper for this mechanism.
The binary file that implements the CPI functionality is provided to BOSH Director through a separate BOSH release that is deployed on the same VM with BOSH Director. This release contains a binary, which is placed in /var/vcap/jobs/<cpi-release-name>/bin/cpi. BOSH finds it using manifest parameters:
1 | properties: |
1 | director: |
1 | cpi_job: cloud-specific-cpi |
The new way to deploy MicroBOSH
For a long time, the standard way to deploy MicroBOSH was to use the special BOSH micro CLI plugin from the official BOSH repository. Along with adding an external CPI to BOSH, a new way to deploy MicroBOSH was also released—a project called bosh-init. This solution made deployment of MicroBOSH much easier and became the last step in the long way to excluding BOSH CPI functionality from BOSH itself.
bosh-init compiles the external CPI release on a machine where you run the bosh-init command. After the CPI binary is ready, bosh-init calls it with the create_stemcell and create_vm parameters, just like BOSH Director does. This makes it possible for bosh-init to launch a VM in a target cloud and send the necessary instructions to the agent. You can find more details in the official documentation.
How BOSH creates VMs for jobs
A CPI is not just a wrapper around API calls. It also provides BOSH Agent with the settings necessary for initializing communication between the agent and BOSH Director. To implement a functional CPI, you need to understand the principles of this communication. So, let’s see how BOSH creates VMs.
BOSH Agent runs on every VM that contains a BOSH job. It helps to run BOSH requests and handle VM system resources (such as disk partitioning, network setup, etc.). BOSH Agent is placed into every stemcell, too. In fact, the stemcell version defines the version of BOSH Agent. Nevertheless, we can update the agent inside a running VM with the kickstarter mechanism, which makes it possible to upgrade the version of BOSH Director without redeploying every BOSH job.
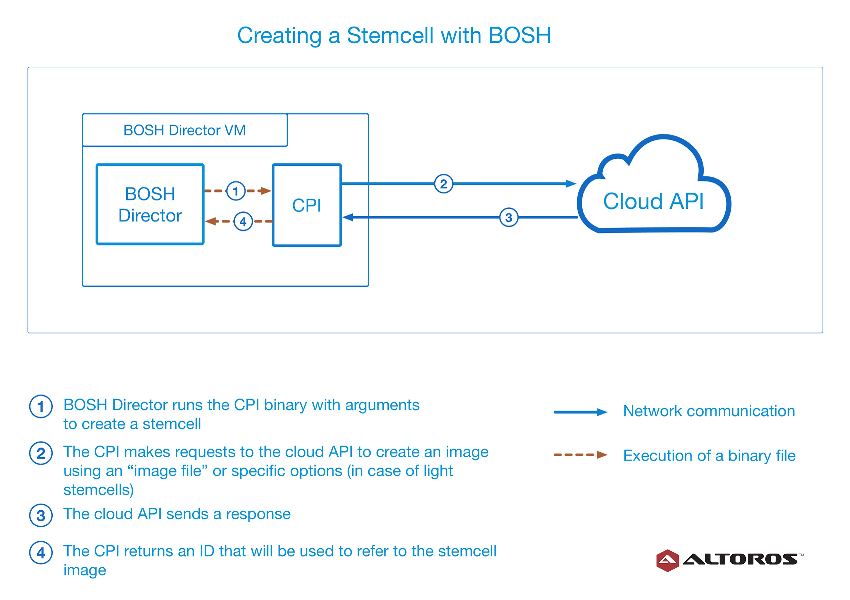
Before creating a BOSH job, you need to upload the stemcell to the infrastructure. This is done by calling the create_stemcell CPI method. With this call, the CPI is provided with an “image file” that will be converted to an IaaS image. For instance, in case of OpenStack, it is a file in the QCOW2 format, vSphere uses VMDK disk format, etc. AWS provides a possibility to use “light” stemcells, where the image file is empty and the stemcell metadata file (stemcell.MF) contains IDs of publicly available AMI images. The CPI uses these IDs to create new instances.
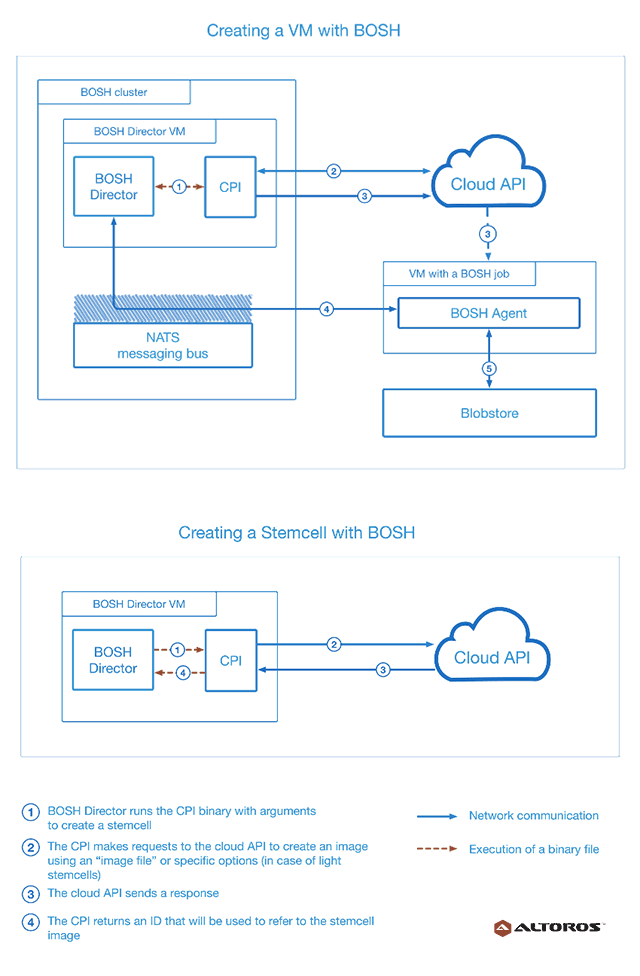
Every CPI treats the “image file” differently, depending on what IaaS you use. In the most general case, this file is uploaded to the cloud and converted into an image using a cloud API. The ID returned by the cloud API is received by BOSH that uses it to refer to this stemcell later on. See the diagram below for more details.

Once the stemcell has been generated, the CPI proceeds to crating a VM.

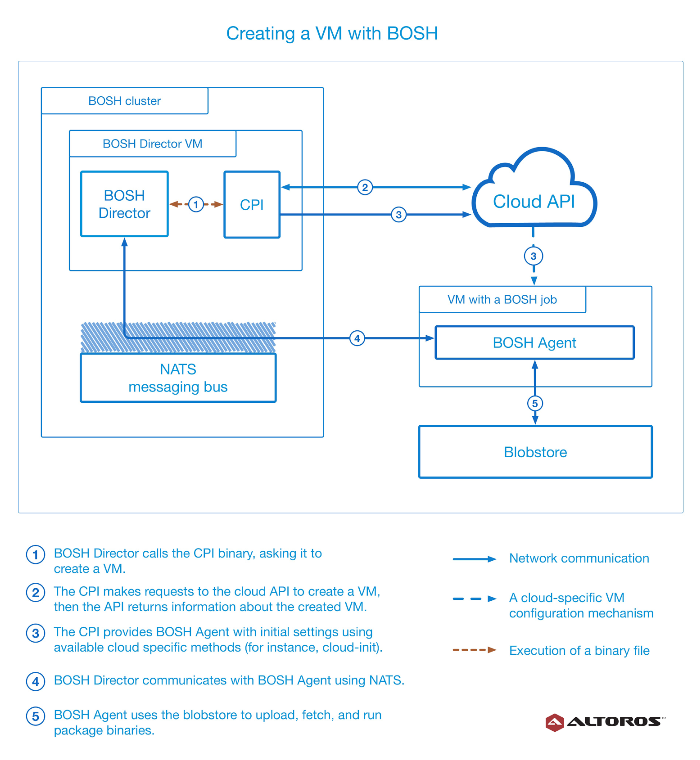
After an image (stemcell) has been created, BOSH executes the CPI binary and tells it to run the create_vm method (step 1). The stemcell ID is passed to the cloud API together with arguments of the call: the CPI makes an appropriate request to the cloud API to create a VM (step 2).
After the VM has been started, BOSH Agent inside this VM is going to look into the /var/vcap/bosh/settings.json file for settings. The settings.json file is built into the stemcell and differs depending on what type of cloud you use. It contains information about the disk naming schema and network configuration. Settings from settings.json tell BOSH Agent how to fetch the initial settings from the CPI. The initial settings contain information on how it can communicate with BOSH Director and other software that uses the CPI. Usually, initial settings contain URLs for the messaging bus and registry (step 3).
The CPI can pass these options to a VM with BOSH Agent in several different ways. The most common mechanism is based on cloud-specific options, such as metadata service in AWS and OpenStack and CD-ROM in vSphere. BOSH Agent decides what method to use based on the configuration in the settings.json file, which is supplied within the stemcell. You can also simply upload a file with settings to a VM that runs a BOSH Agent (step 4).
After BOSH Agent gets the initial settings, it will be able find the registry (if it exists) and the messaging bus. In case of a fully functional deployment, BOSH Agent will use NATS to talk to BOSH Director. If the messaging bus is set to use the HTTPS protocol (the URL in the mbus option starts with “https://”), BOSH Agent launches an HTTPS server and treats requests sent to this server as notifications from a messaging bus (step 5).
After that stage, BOSH Agent starts getting instructions through the messaging bus. This means BOSH Director can tell BOSH Agent what blobs to compile and what jobs to run (step 6). At the same time, BOSH Agent can retrieve the Monit status of running services and notify BOSH Director about it.
How to build a new CPI
First of all, you need to have a programmatic interface to work with the API of the IaaS. If you are considering Ruby as the implementation language, you probably want to use fog. This gem supports many popular IaaSes and its fog-core library implements a convenient DSL for the REST API. Originally, fog-core was designed for the REST API, so it doesn’t support such approaches as HATEOAS out of the box.
Once you have an interface, you can use an API wrapper to implement the CPI binary. The easiest way to find out how this binary should work is to follow the code of existing external CPIs, e.g., for OpenStack, vCloud, or AWS. Most of them are implemented as separate gems written in Ruby, but some are written in Go, e.g., the Warden CPI.
After you have implemented the CPI, you will need to create a CPI release. At this point, you may also find it useful to look at some publicly available CPI releases: for OpenStack, AWS, or vCloud. More useful information about how to create a release can be found in BOSH documentation or this blog post.
What else you need to enable BOSH on your cloud
We are glad that it has become a lot easier to build and maintain new BOSH CPIs compared to last year. Still, creating a CPI is only part of what you need to add BOSH support to a custom cloud. You also have to build your own stemcells, which is generally one of the hardest steps in the process. So, the third and last blog post in this series will be dedicated to creating a custom stemcell from scratch. If you have any questions, feel free to comment below.


