An Outstanding Cloud Foundry Feature: App Placement and Host Affinity

Out of the box, Cloud Foundry doesn’t give us the ability to control application placement or to specify a target host(s) for an application. This may be critical when one needs to separate apps between different environments or host types—or for any other type of app segregation. The good news is that this can be resolved very easily.
Why bother?
Scenarios where this ability may be needed:
- physical separation of applications between environments in a single Cloud Foundry deployment (e.g., development / staging / production)
- segregation of applications by the host’s hardware (
slow_but_cheap/fast_but_expensive/with_gpu) - placing together two microservices that have a huge amount of communication traffic and will benefit from lower latencies
- a use case with only asingle app instance per host (e.g., a crypto that encrypts traffic for the whole host)
- well, actually, for any other type of segregation
One would say, okey, but we already have Availability Zones (AZ)!
It is a different thing. Cloud Foundry tries to balance (using internal algorithms) instances of an application between AZs. There is no way to specify a target AZ for an application or an instance of an application. “Host affinity” or “placement constraints” are needed to control application placement.
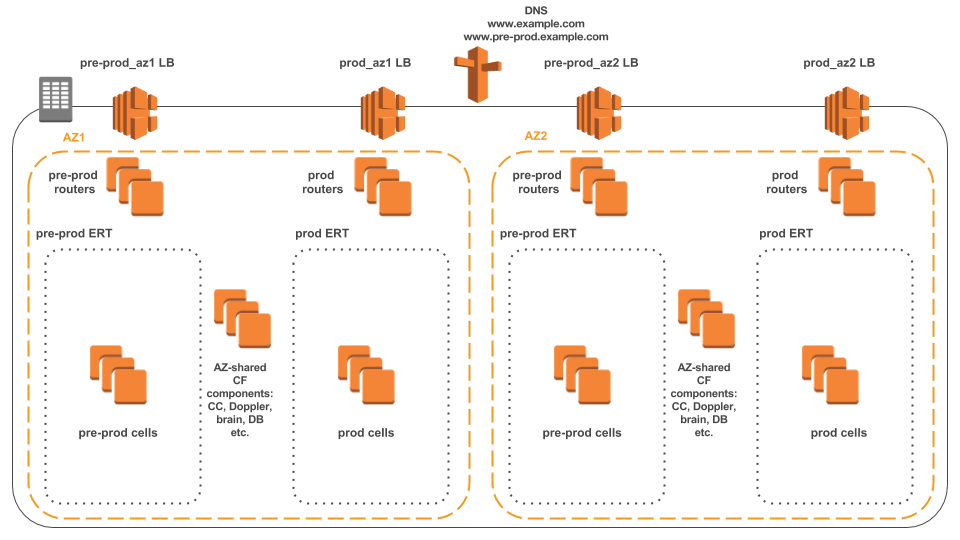
For instance, a reference architecture of your deployment may look like the one below.
 A sample deployment architecture
Solution (well, a workaround)
In brief, it is possible to control application placement by defining stacks with custom names in the Cloud Foundry deployment manifest. There is no need to actually create them, and no release modification is needed.
Cloud Foundry uses the concept of stacks (prebuilt root file systems) to support specific operation systems. Here are some of the examples:
cflinuxfs2windows2012R2
However, nothing stops us from listing more stacks, even without creating modifications to them:
cflinuxfs2_devcflinuxfs2_stgcflinuxfs2_prdname_of_your_choice
Instructions for Diego
In our example, we define a “production” affinity group of hosts, so that every application for production (and only for production) will run on the specific group of hosts. All you need is to modify your Cloud Foundry deployment manifest. No need to create new stacks. No need to modify a Cloud Foundry release, as well. Just list your stacks in the Cloud Controller properties.
1 2 3 4 5 6 7 8 | properties: ... cc: stacks: - name: "cflinuxfs2" description: "Cloud Foundry Linux-based filesystem" - <strong>: "cflinuxfs2_prd" description: "Cloud Foundry Linux-based filesystem (PRODUCTION)"</strong> |
Define your affinity group (REP properties).
1 2 3 4 5 6 7 8 9 10 11 | - instances: 10 name: cell_z1_prd networks: - name: diego_prd1 properties: <strong>diego: rep: stack: cflinuxfs2_prd preloaded_rootfses: - "cflinuxfs2_prd:/var/vcap/packages/rootfs_cflinuxfs2/rootfs" zone: z1</strong> |
Modify Diego properties for the NSYNC and STAGER components.
1 2 3 4 5 6 7 8 9 10 11 12 13 14 15 16 17 | properties: diego: ... nsync: lifecycle_bundles: - "buildpack/cflinuxfs2:buildpack_app_lifecycle/buildpack_app_lifecycle.tgz" - <strong>"buildpack/cflinuxfs2_prd:buildpack_app_lifecycle/buildpack_app_lifecycle.tgz"</strong> - "buildpack/windows2012R2:windows_app_lifecycle/windows_app_lifecycle.tgz" - "docker:docker_app_lifecycle/docker_app_lifecycle.tgz" ... stager: lifecycle_bundles: - "buildpack/cflinuxfs2:buildpack_app_lifecycle/buildpack_app_lifecycle.tgz" - <strong>"buildpack/cflinuxfs2_prd:buildpack_app_lifecycle/buildpack_app_lifecycle.tgz"</strong> - "buildpack/windows2012R2:windows_app_lifecycle/windows_app_lifecycle.tgz" - "docker:docker_app_lifecycle/docker_app_lifecycle.tgz" |
Instructions for DEA
The same as with Diego, all you need is to modify your Cloud Foundry deployment manifest. List your stacks in the Cloud Controller properties.
1 2 3 4 5 6 7 8 | properties: ... cc: stacks: - name: "cflinuxfs2" description: "Cloud Foundry Linux-based filesystem" - <strong>name: "cflinuxfs2_prd" description: "Cloud Foundry Linux-based filesystem (PRODUCTION)"</strong> |
Define your affinity group (DEA properties).
1 2 3 4 5 6 7 8 9 10 11 12 13 14 15 16 17 18 19 20 | - instances: 10 name: runner_z1_prd networks: - name: cf1 static_ips: null properties: consul: agent: services: dea: check: interval: 5m name: dns_health_check script: /var/vcap/jobs/dea_next/bin/dns_health_check status: passing dea_next: zone: z1 <strong>stacks: - name: "cflinuxfs2_prd" package_path: "/var/vcap/packages/rootfs_cflinuxfs2/rootfs"</strong> |
A sample application manifest
To target specific affinity group (in our example, “production”) just specify the appropriate stack in your application manifest.
1 2 3 4 5 6 7 8 9 10 11 | --- applications: - name: hello-spring-cloud memory: 512M instances: 1 host: hello-spring-cloud-${random-word} path: target/hello-spring-cloud-0.0.1-SNAPSHOT.jar buildpack: java_buildpack <strong>stack: cflinuxfs2_prd</strong> env: SPRING_PROFILES_DEFAULT: cloud |
Conclusion
So, as you can see, it is pretty easy to define affinity groups in Cloud Foundry and to control application placement. It would be great to see this as a native feature in Cloud Foundry, but this workaround also works well.
We’d also like to see the ability to specify placement constraints in the application manifest, as featured below.
1 2 3 4 | -- constraints: - production - with_gpu |
Pros:
- no need to build your own custom stack
- no need to modify a Cloud Foundry release
- No need to modify your applications
- Works for DEA and Diego cells
Cons:
- No way to request a list of constraints
- May require buildpack customization (The Java buildpack works well, but I’ve experienced some limitations for the Python buildpack.)
In addition, to separate app traffic, it is also worth considering using different load balancers / routers for different affinity groups (at the DNS level). Please share your thoughts if you have anything else to add.
Many thanks to Sean Keery (Pivotal) and Duncan Winn (Pivotal) for inspiration!
Further reading
- How to Create a Perfect Cloud Foundry Manifest
- Tuning Configuration of the CF Java Buildpack to Avoid Out-of-Memory Errors
- Multi-Data Center as a Cloud Foundry Deployment Pattern


